Creating your own scent diffuser bottles is a fun and rewarding DIY project. Not only do they add charm to any space, but they also fill your home with calming, natural fragrances. With essential oils, you can customize scents to suit your mood or setting. Crafting your diffuser bottle gives you full control over the design and aroma.
Whether you’re a beginner or a seasoned crafter, this guide will walk you through simple steps to make beautiful, functional diffusers. Let’s dive into the world of DIY scent diffusers!
Why Use Essential Oils for Diffusing?
Essential oils offer a natural and therapeutic way to freshen up your space. Unlike synthetic air fresheners, they provide pure, plant-based fragrances that promote relaxation and well-being. Many essential oils have soothing properties that can help reduce stress, improve focus, and even enhance sleep quality.
They also act as natural air purifiers, cleansing the air of unwanted odors. By using essential oils in your diffuser bottles, you can create a calming atmosphere tailored to your needs. Plus, each scent brings its own unique benefits, from energizing citrus to relaxing lavender.
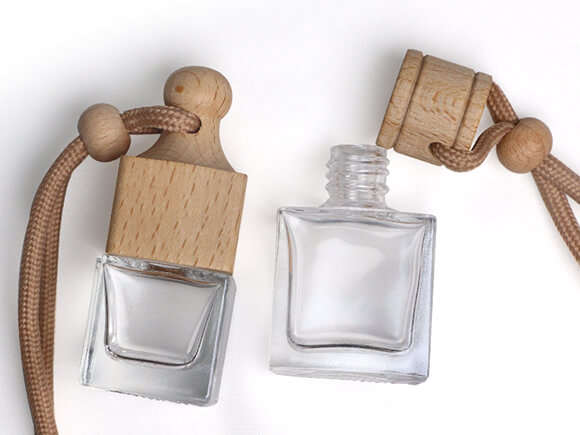
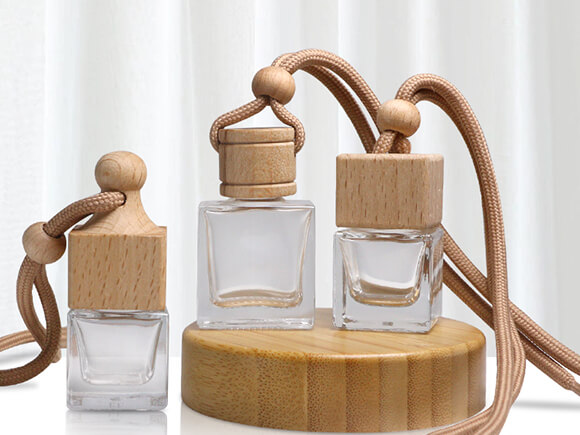
How to Choose the Right Diffuser Bottle for Your DIY Project?
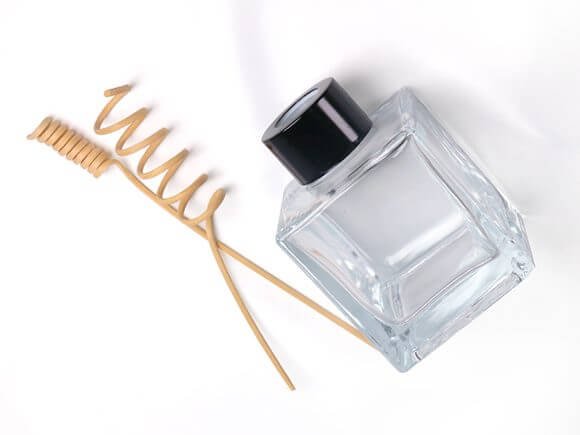
Choosing the right diffuser bottle is key to both function and style. Start by considering the size; larger bottles last longer but may take up more space. Opt for glass or ceramic, as these materials preserve the integrity of the essential oils. Clear bottles let you showcase your oil blends, while tinted bottles protect oils from sunlight.
Think about the design; sleek and modern or rustic and vintage, depending on your decor. Additionally, ensure the bottle has a narrow neck or opening to hold the reeds securely. The right bottle will enhance the aesthetic and effectiveness of your diffuser.
Essential Oils: Picking the Perfect Scents for Your Space
Choosing the right essential oils for your space depends on the mood you want to create. For a calm and relaxing atmosphere, lavender, chamomile, and sandalwood are ideal. If you’re looking for an energy boost or focus, try invigorating oils like peppermint, lemon, or eucalyptus. For a warm, cozy feel, cinnamon, vanilla, and clove work wonders. Consider blending different oils to create a custom scent that suits your personal taste.
Remember, each room may need a different aroma. Light florals for bedrooms and refreshing citrus for kitchens. Let the scent enhance your space’s vibe!
Step-by-Step Guide: How to Make Your Own Scent Diffuser Bottles
● Gathering Your Materials
To start your DIY diffuser bottle, you’ll need a few basic supplies:
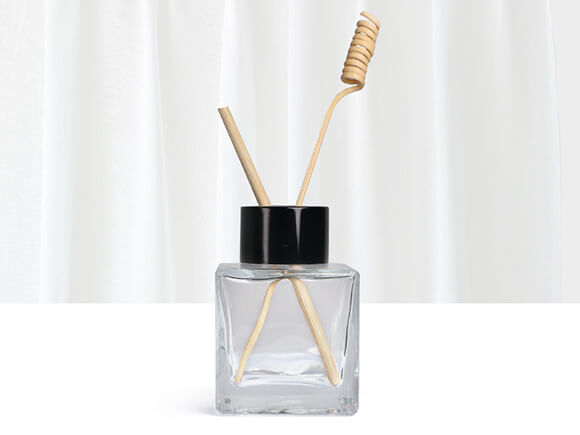
- A glass or ceramic bottle with a narrow neck
- Reed sticks or bamboo skewers
- A carrier oil (such as almond or fractionated coconut oil)
- Essential oils of your choice
- A funnel (optional)
- A dropper for essential oils
- Decorative elements (optional, like flowers, beads, or ribbon)
Having all the materials in place will make the process smoother and more enjoyable.
● Preparing the Essential Oils Blend
Next, create your custom scent blend:
- Pour about ¼ cup of carrier oil into your diffuser bottle.
- Add 20-30 drops of your chosen essential oils. You can mix different oils to create a unique fragrance.
- Adjust the number of drops depending on how strong you want the scent. Start with fewer drops and test as you go.
A popular blend could be lavender and eucalyptus for a calming yet refreshing scent. Experiment with different combinations until you find the perfect one!
● Assembling the Diffuser Bottle
Once your blend is ready, it’s time to assemble your diffuser:
- Using a funnel, carefully pour your essential oil mixture into the bottle.
- Insert 5-10 reed sticks into the neck of the bottle. The more reeds you use, the stronger the fragrance will be.
- Let the reeds soak in the oil for about 24 hours. After that, flip them over to release the scent into your space.
- Decorate your bottle with a ribbon, beads, or a tag to add a personal touch.
Now you have a beautiful, handmade scent diffuser that will bring delightful fragrances into your home!
Design Tips: Making Your Diffuser Bottles Beautiful and Unique
● Decorating with Natural Elements (Flowers, Twigs, etc.)
You can transform your stylish diffuser bottle into a decorative piece by adding natural elements. Dried flowers, small twigs, or even pinecones can bring a rustic, earthy feel. For a floral touch, consider using lavender sprigs or rose petals inside the bottle. These elements not only add beauty but also enhance the overall aesthetic of the diffuser.
You can also tie a small bunch of dried herbs around the neck of the bottle with a ribbon to give it a charming, handmade look. Natural decorations can complement your home’s style and make the diffuser bottle even more special.
● Using Colored Bottles or Glass Designs
Another way to make your diffuser bottle stand out is by choosing colorful or uniquely designed glass bottles. Tinted bottles, in shades like amber or cobalt blue, can help protect the essential oils from sunlight while adding a vintage or eclectic touch. You can find decorative glass bottles with intricate patterns, such as etched designs or embossed logos, that lend an elegant feel to your DIY diffuser.
If you want to be creative then you can even paint the outside of a clear bottle with glass paint to match your décor. The possibilities for design are endless, so let your creativity shine!
How to Use Your DIY Diffuser Bottle for Maximum Effectiveness?
To get the most out of your DIY scent diffuser, follow these simple tips:
- Place in the Right Spot: Position your diffuser in an area with good air circulation, like a hallway or near an open window. Avoid placing it in areas with direct sunlight, as it can cause the oils to evaporate too quickly.
- Use the Right Number of Reeds: The more reeds you use, the stronger the scent. Start with 5-6 reeds, and increase if you prefer a more intense fragrance. If the scent fades over time, flip the reeds to refresh the aroma.
- Maintain the Oil Level: Keep an eye on the oil level in the bottle. When it gets low, top it up with your essential oil blend to keep the fragrance going strong.
- Flip the Reeds Regularly: To enhance the scent, flip the reeds every few days. This allows the oils to reach the tips of the reeds, which helps the scent disperse more effectively throughout the room.
- Clean the Bottle Periodically: Over time, dust and oils can build up. Clean the bottle and reeds every few weeks by rinsing them with warm water. Refill with a fresh blend of oils to keep your diffuser smelling great.
By following these tips, you’ll ensure your DIY diffuser bottle lasts longer and fills your space with beautiful scents continuously.
How to Maintain and RefreshYour Scent Diffuser Bottle?
Maintaining and refreshing your scent diffuser bottle is simple and essential for long-lasting fragrance. First, clean the bottle and reeds every few weeks to prevent oil buildup and ensure proper diffusion. Wash the bottle with warm, soapy water, and rinse thoroughly. For the reeds, gently wipe them with a cloth or replace them if they’ve become clogged.
To refresh the scent, empty the bottle and refill it with a new essential oil blend. If the fragrance has weakened, flipping the reeds or adding a few extra drops of essential oil can help boost the scent. Regular maintenance keeps your diffuser smelling fresh and ensures it remains an effective and decorative addition to your home.
The Bottom Line
Creating your own DIY scent diffuser bottles is a fun, creative way to bring soothing aromas into your home while adding a personal touch to your decor. By selecting the right materials, essential oils, and design elements, you can craft a beautiful and functional diffuser bottle that fits your space perfectly.
With a little care and maintenance, your diffuser will continue to provide a calming atmosphere for months to come. If you’re looking for high-quality materials or need help with your next DIY project, contact Hongmo today to get a quote and start crafting your perfect diffuser!
FAQs
How long will my DIY scent diffuser last?
The lifespan of your diffuser depends on the size of the bottle, the number of reeds, and how often you flip the reeds. Typically, a diffuser will last for 1-2 months before needing a refill.
Can I use any essential oils in my diffuser bottle?
Yes, but it’s important to choose high-quality, pure essential oils. Some oils, like citrus or cinnamon, may need more frequent replenishing due to faster evaporation.
How many reeds should I use in my diffuser bottle?
The number of reeds you use affects the intensity of the fragrance. Start with 5-6 reeds for a balanced scent, and adjust depending on your preferences.
Why isn’t my diffuser bottle releasing enough scent?
If the scent is weak, try flipping the reeds or adding a few more. Ensure the bottle is placed in a well-ventilated area, away from direct sunlight, which can cause oils to evaporate too quickly.
Can I reuse the bottle for a different scent?
Yes, but it’s best to clean the bottle and replace the reeds before refilling it with a new essential oil blend to avoid mixing scents or lingering odors.